FAQ: What is the best display for an Arduino?
The best display for an Arduino is the one that makes your project work great and look great.
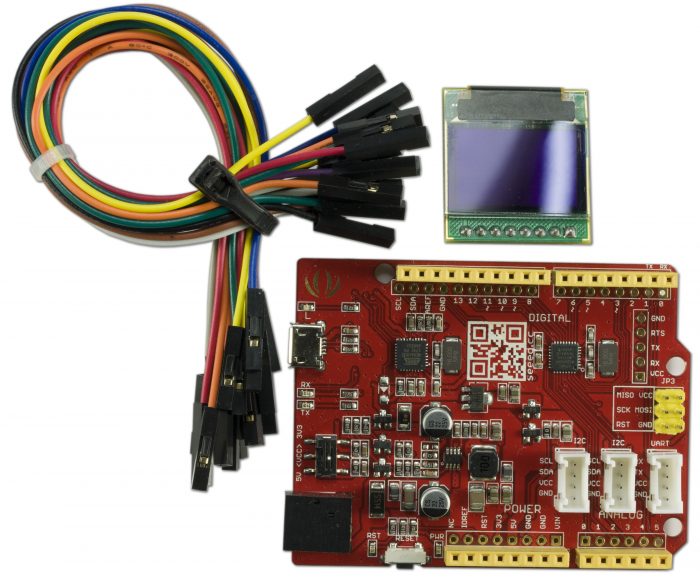
Short answer: the Crystalfontz 96×64 OLED or the Crystalfontz Arduino shield kit with a graphic LCD display.
Long answer: Crystalfontz has many displays, and lots of them can easily work with an Arduino — but you need to choose carefully to make sure the display you like will work easily with the Arduino. At a top level, you need to make sure that the display can work with your hardware and your software.
Hardware – Interface
One of the first tasks is to choose the interface you want to use. The most popular interface for small displays is SPI. SPI is great because it only uses a few lines.
Here are some typical SPI display lines:
- SCK = SPI Clock — shared with other SPI devices
- MISO = Master In, Slave Out (not needed on all displays) — shared with other SPI devices
- MOSI = Master Out, Slave In — shared with other SPI devices
- nCS = Chip Select. When this line is low you can talk to the display
- D/C = Command / Data. When this line is high, you write to the display’s data register. When this line is low, you write to the display’s command register.
- nRES = Reset. Drive this line low to reset the display’s controller. Keep it high for normal operation.
So SPI only takes 6 lines, three of which can be shared with other SPI devices, like a uSD card.
On an Arduino UNO, the SPI clock is limited to 8MHz. Under the best of conditions, that means that the hardware can transfer at a rate approaching 1MB/second. That is under the best conditions — it is more realistic to plan on 250 ~ 500 KB/second. For a small display, that can be plenty fast.
Hardware – Displays
Take for instance our popular CFAL12832D-B — the Crystalfontz 128×32 I2C Graphic OLED Module with ZIF Connector. This display has 128×32 = 4096 pixels, and each byte encodes 8 pixels so you need to transfer 4096/8 = 512 bytes. So even if your SPI is only getting 250KBytes/second. you could still update the display 250KBytes/second / 512 bytes/update = 488 updates per second. Certainly, an Arduino can update this little OLED quickly enough.
Another fun display is the Crystalfontz CFAF240240A1-013T. This is a fantastic little watch-sized wearable IPS TFT display. Let’s do the math to see how quickly we could update it.
This display has 240×240 = 57,600 pixels. Assuming you encode each color pixel as 16 bits you need to transfer 115,200 bytes to update the display. Let’s assume that you can get 500KB/second from your SPI: 500KBytes/second / 115,200 bytes/update = 4.3 updates per second.
This still might be OK for many applications, but you are not going to get smooth video.
Some displays have 8-bit or 16-bit wide parallel interfaces. At first glance, it would be reasonable to think that you could talk to these displays at 8 or 16 times faster than the 1-bit wide SPI. However, with the Arduino — and most current microcontrollers — the parallel transfer must be “bit-banged” under software control and this transfer might be slower than SPI!
In general, you need to make sure that the bandwidth of the interface you choose combined with the amount of data that it takes to update the display can update the display quickly enough for your application.
Software – Code and Libraries
As well as selecting a display that is compatible on a hardware level, you also need to consider the software. Crystalfontz supplies simple Arduino demo code for many of our displays. Be aware that this code is truly simple. Its only task is to initialize the display and show a demonstration image. Some of the demos also include some graphics primitives (pixel, line, circle, etc) but these are not full graphics libraries.
There are some great libraries available. The open source U8G2 is fully open and a reasonable choice for monochrome displays. On the commercial side, RamTEX may be a good, reasonably priced choice. We like RamTEX because it ships as source code, which ensures that you can maintain your embedded product indefinitely.
With many libraries, there is the choice between writing to individual dots in the display memory or having a framebuffer in the microcontroller’s memory and writing this entire framebuffer to the display when it is time to update.
If you have enough room available in the microcontroller’s memory, the framebuffer approach greatly speeds drawing, since the operations to set a pixel to a given color is just a write to memory. Once a complete screen is drawn in the microcontroller’s memory, an update routine transfers this data to the display.
Using the method of writing to the individual pixels on the display can greatly reduce the memory used in the microcontroller, but at the expense of speed. To change one pixel, in the worst case, several steps are required: set the address, read the existing data, modify the data, set the address, and write the data.
Additional References:
Need Help?
This may all seem to be confusing, and to be fair, it is. It would take an expert on displays who is familiar with embedded systems to sort through all the options. Relax, you have Crystalfontz. Contact our sales support team to describe your project and we can explain the options, answer any questions, and help you select the right display for your Arduino project.