Flexible OLED Smart Watch

Kevin Choi is back at it with neat projects. Last time, it was Transparent OLED smart glasses, this time a cuff-style watch with an embedded flexible OLED!
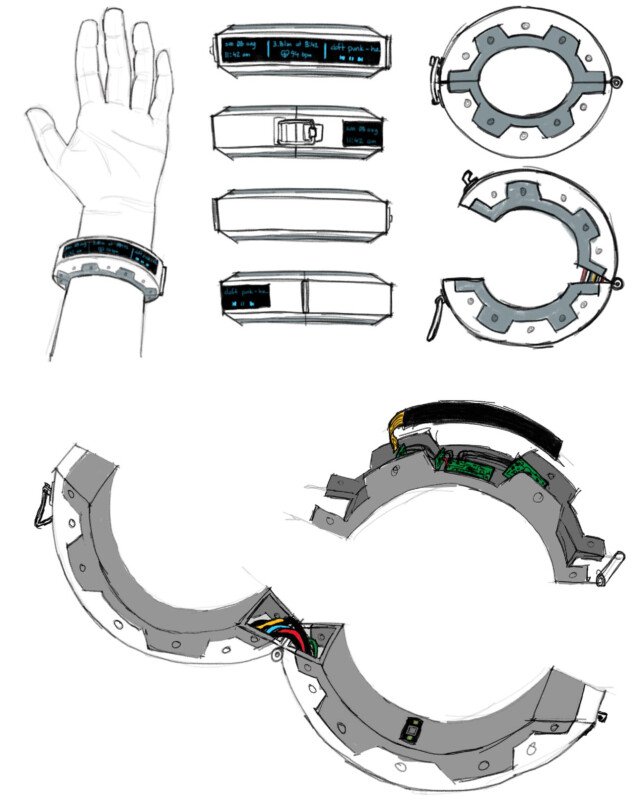
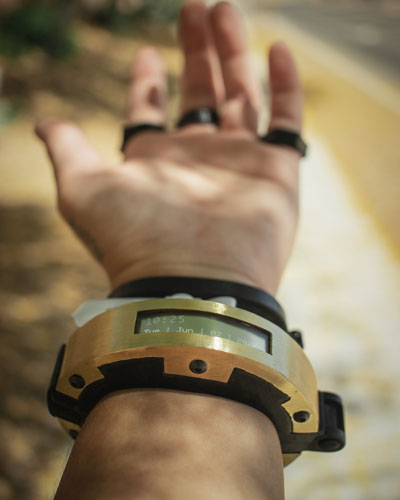
This watch uses our flexible OLED bent into the cuff chassis. A button on an attached ring allows Kevin to turn the OLED on and off (a smart way to conserve battery life and extend the OLED lifetime!)
Kevin’s Description of His Build
The inspiration for this watch came from the Cuff Links from Hideo Kojima’s Death Stranding and the black and gold aesthetic from Deus Ex.
Part List:
- 160×32 Flexible OLED Display
- SparkFun SSD1320 breakout
- Arduino Nano Every
- Adafruit DS3231 RTC module
- Adafruit DIY Magnetic 3 Pin Connector
- 3.7v 280mAh battery
- TP4056 battery charge protection circuit
- 3D printed PLA inner chassis
- Brass sheet metal outer chassis
Build Description
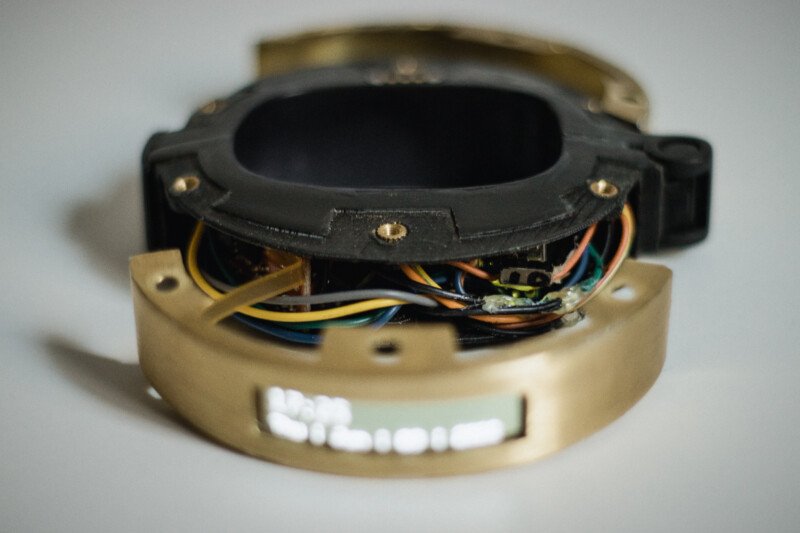
The watch is running on an Arduino Nano Every, wired up to a breakout board to drive the flexible OLED, an RTC module to keep time, and a lithium ion battery for power.
The breakout board from SparkFun uses SPI protocol, so in addition to Vin and GND wires to power the display, SCLK, SDIN, CS, and RES on the breakout board are wired and soldered to pins D13, D11, D8, and D9 on the Nano Every respectively. Note – the CS pin on the Nano Every is on D8 rather than D10, like it is on other Arduino controllers. It took me a while to figure that out.
The Adafruit DS3231 RTC module, which was the smallest I could find, uses the I2C interface, so its SDA and SCL pins are connected to the Nano Every’s D18 and D19 pins. All pin headers were removed from these boards and modules to maximize space efficiency.
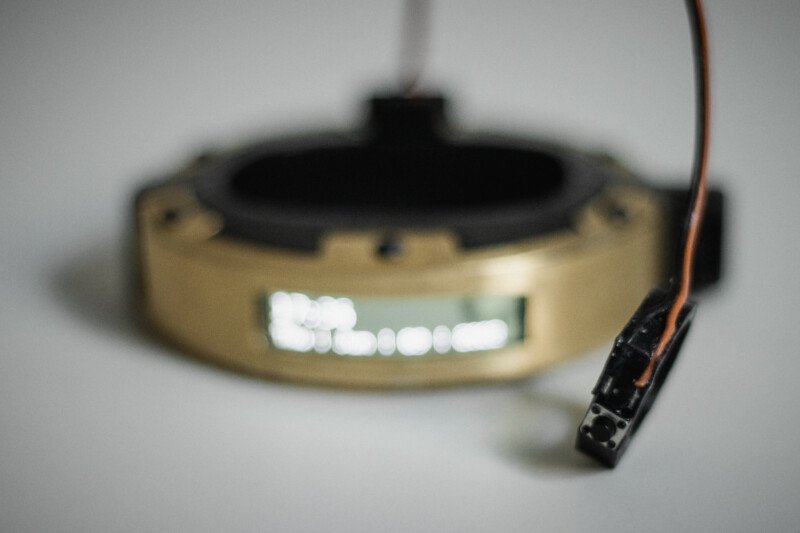
Pin D14 is wired to one terminal of a push button mounted on the back of the brass chassis, with Pins D6 and GND wired to the button’s opposite terminal. Pressing this button tells the Arduino to print the current time and date to the display and clear on a 5 second delay. The wires leading to the button terminals also split off to two pins on the 3 pin “female” mag connector, which is exposed on the top of the 3D printed inner chassis. Its corresponding “male” connector is wired to another push button mounted on a 3D printed ring, so when this ring is connected to the watch, pressing it also prints the time. This lets me wake the display without having to reach over to press the chassis button with my other hand, and also because I didn’t want to have to deal with any sort of annoying wrist-lifting gesture to try and wake the display.
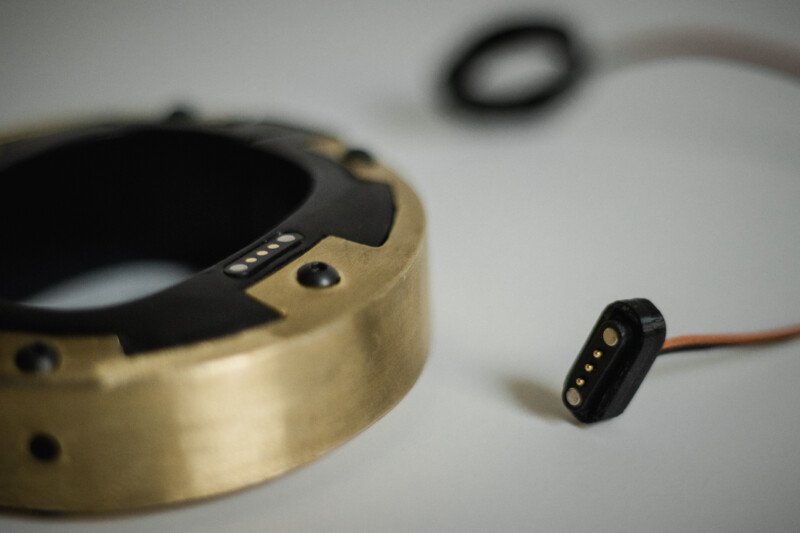
The lithium ion battery used to power the watch is connected to a TP4056 battery charge protection circuit, and the positive and negative out pins from that are connected to the Nano Every’s Vin and GND pins. The TP4056 typically charges with a micro-USB cable, but because it is inside the watch the charging port wouldn’t be able to be used, so I desoldered that micro-USB connector, and soldered positive and negative wires that run to another 3 pin mag connector, which is mounted on the bottom side of the inner chassis. Its corresponding mag connector will be placed in a 3D printed charging dock.
Chassis Build
The 3D printed inner chassis was modeled in Rhino using custom measurements from my wrist. I used this 3D model to verify that all the PCBs and components would properly fit before purchasing them. The inner chassis was then printed on a Creality Ender 3 printer with black PLA with a print-in-place hinge and a basic latch design. Because I wanted it to be a smooth finish, I sanded the final print down starting from around 300 grit and worked up to 1000 grit.
The outer chassis was made with .016″ thick brass sheet metal. I decided to use brass for this portion because instead of welding, it can easily be soldered instead to the same effect. Other metals like copper and aluminum could theoretically work as well.
Future Improvements
At the moment, this smart watch is honestly not that smart, as it is currently only running on an Arduino Nano Every which lacks any WiFi or Bluetooth connectivity. However, the Every will soon be replaced with an ESP32 TinyPICO, which should be able to be used in tandem with the Blynk app for some smart functionality. Other features that I will start working into V2 include other basic watch functionality such as timers and alarms, low-power mode for better battery life, LEDs for a built-in flashlight, and possibly a heart-rate monitor.
Other Projects
Contact Us
If you have any questions, we can be reached at support@crystalfontz.com, we also provide chat and telephone support Monday through Friday during our open hours.
We love to hear about your projects! Find us around the web (YouTube, Facebook, Instagram, LinkedIn, Twitter, Forum) and let us know what you’re working on.

Kelsey is an engineer at Crystalfontz. She graduated from Gonzaga University with a BS in Electrical Engineering. Kelsey’s roles at Crystalfontz include product design, custom parts, customer support, documentation, and product demonstrations.
What our customers say about Kelsey:
“As a new user to the world of LCD electronics, Kelsey has been a Godsend in providing the hand-holding I needed to get my project up and running despite my own efforts at fouling things up! :-)” – Owen M
“Kelsey got me through changing code for a new LCD in only two short emails.” – Phillip V
“The agent that I talked with (Kelsey), is technically sound and she knows what she is doing. The support is what made my job easier to get started with the different display technologies. Thank you!” – Vatsal S