Custom Images on EVE Displays
A frequent question that is received by our support team is how to load custom images on our EVE lineup of displays. Due to differences in the EVE processors between boards and other factors, depending on the display you have, the process may change. The different processes for the boards have been outlined below. The only software required is the handy EVE Asset Builder (EAB) available on Bridgetek’s website here.
Images from SD Card
The process outlined below is for an SD card loaded with your image. To program an image to the Arduino’s flash memory without the use of an SD card, keep reading!
EVE BT817 Boards
Our displays that use this processor on their EVE carrier board are as below:
- 5″ displays: CFA800480E3-050SC, CFA800480E3-050SN, CFA800480E3-050SR, CFA800480E3-050SW
- 7″ displays: CFAF1024600B0-070SC-A1
- Select the image you would like to display (perhaps the most important step!), in this example, I will be using a Crystalfontz splash screen for our 5″ lineup
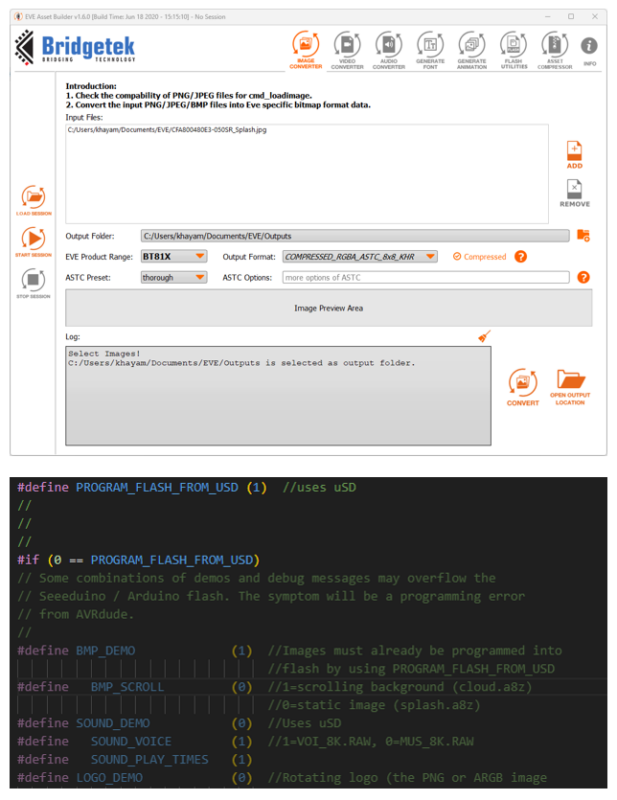
- Open EAB and load the image selected. Specify the output folder and select BT81x as the EVE product range. Set the output format to “COMPRESSED_RGBA_ASTC_8x8_KHR”, check compressed, and set the ASTC Preset to thorough
- Press convert and open the output directory. Rename the resulting ***.bin file to “splash.a8z” (the extension must be changed)
- Copy the renamed file to the SD card
- In our demo code, for the display you have, set “PROGRAM_FLASH_FROM_USD” to 1. This line is located in the CFA10XXX_defines.h file. Once changed, upload the sketch to the Arduino/Seeeduino
- Open the serial monitor at 115200 baud and copy the output lines corresponding to lines 92-101 of CFA10100_defines.h or 96-105 of CFA10108_defines.h Not getting an output? Perhaps “DEBUG_LEVEL” in CFA10XXX_defines.h is set to “DEBUG_NONE”. Please try again with it set to “DEBUG_STATUS” or “DEBUG_GEEK”
- Paste the lines in CFA10XXX_defines.h overwriting the existing data
- Set “PROGRAM_FLASH_FROM_USD” to 0 and set “BMP_DEMO” to 1 and upload the sketch
- Your image should now be displayed
EVE FT811 Boards
Our displays that use this processor on their EVE carrier board are as below:
- 2.4″ displays: CFA240320E0-024SC, CFA240320E0-024SN
- 3″ displays: CFA240400E1-030TC, CFAF240400E1-030TN
- 3.9″ displays: CFA480128E0-039TC, CFAF480128A0-039TN-A1-1
- Select the image you would like to display. Like with the case of the previous example, I will be using a Crystalfontz splash screen
- Open EAB and load the image selected. Specify the output folder and select FT81x as the EVE product range. Set the output format to “RGB565” and uncheck compressed
- Press convert and open the output directory. Rename the resulting ***.raw file to “SPLASH.RAW” (the extension must be changed and the name is case sensitive)
- Copy the renamed file to the root of the SD card, set “BMP_DEMO” to 1 in “CFA10XXX_defines.h” and upload the sketch
- Your image should now be displayed

Images from Flash
What if you need to change the images written to the Arduino’s flash memory (when “LOGO_DEMO” or “LOGO_PNG_0_ARGB2_1” is set to 1)? Well look no further, the process is outlined below.
PNG Logos
- Select the image you would like to display. Preferably a small 300×300 (or similar) image
- Provide the image as an input to the following website: https://lvgl.io/tools/imageconverter
- Set the color format to “CF_RAW” and the output format to “C array”. Uncheck dithering and click convert
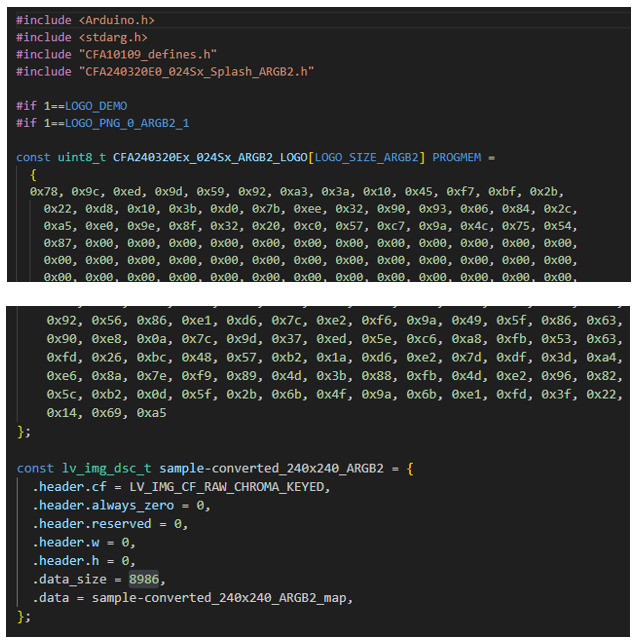
- Open the resulting file (in .c format). Copy the array of data to the location where the PNG file is stored, “Round_Logos.cpp”, “CFA240320E0_024Sx_Splash_PNG.cpp”, etc.
- At the bottom of the .c file generated previously, copy the size to the corresponding header file (of the previous cpp that the array was copied to)
- Set “LOGO_DEMO” to 1 (“LOGO_PNG_0_ARGB2_1” should be set to 0) and upload the sketch
- Your image should now be displayed
ARGB2 Logos
- Select the image you would like to display, preferably a small 300×300 (or similar) image
- Index the image to 4 colors (this can be done using the editing software GIMP). This is done to reduce the size of the image
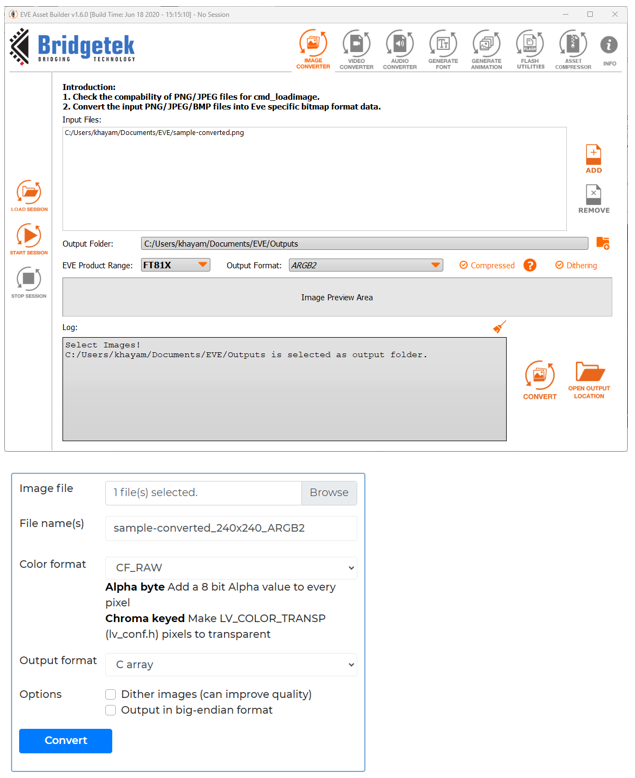
- Once indexed, load the image to EAB. Select FT81x as the EVE product range and the output format as ARGB2. Check compressed
- Select convert and open the output directory. Provide the ***.bin file as an input to the following website: https://lvgl.io/tools/imageconverter
- Set the color format to “CF_RAW” and the output format to “C array”. Uncheck dithering and click convert
- Open the resulting file (in .c format). Copy the array of data to the location where the ARGB2 file is stored, “Round_Logos.cpp”, “CFA240320E0_024Sx_Splash_ARGB2.cpp”, etc.
- At the bottom of the .c file generated previously, copy the size to the corresponding header file (of the previous cpp that the array was copied to)
- Set “LOGO_DEMO” and “LOGO_PNG_0_ARGB2_1” to 1 and upload the sketch
- Your image should now be displayed
Contact Us
If you have any questions, we can be reached at support@crystalfontz.com, we also provide chat and telephone support Monday through Friday during our open hours.
We love to hear about your projects! Find us around the web (YouTube, Facebook, Instagram, LinkedIn, Twitter, Forum) and let us know what you’re working on.

Khayam is an Electrical and Electronic Engineer who migrated to the United States in 2022. He is a passionate academic interested in emerging technologies in the fields of AI and Robotics.
Hobbies
In his free time, Khayam enjoys watching Anime, reading Manga, and working on Digital Art. His favorite pastimes include; spending time with his girlfriend, gaming with friends, and catching up with his family.