Setting Up Your EVE Display: A Quick Guide
Have you just purchased one of our Embedded Video Engine (EVE) displays and are wondering how to get up and running? This blog post aims to help users get started with their newly received EVE displays from setting up the hardware to running various demos.
Before we jump in, if you have not already, take a moment to read our blog post on FTDI/Bridgetek Embedded Video Engine (EVE) Modules to get an idea of the various functionalities that the EVE makes possible and what makes them so great!
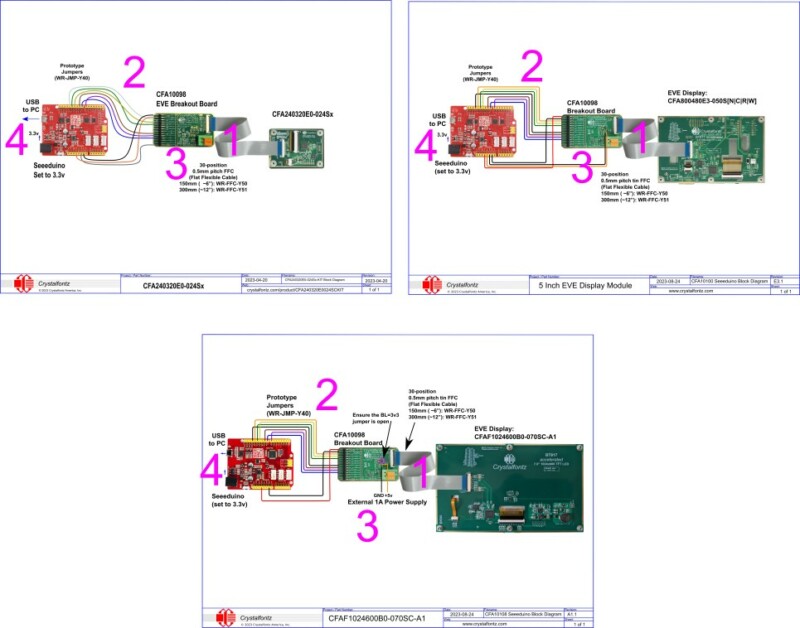
Setting up the hardware
This section outlines how to interface an EVE display with a microcontroller to try out our demo code.
Our demo code uses a Seeeduino (Arduino UNO clone that operates at 3.3V), however, can be modified to work with most 3.3V, SPI-capable microcontrollers. If you purchased any of our development kits such as the CFA800480E3-050SC-KIT or the CFAF1024600B0-070SC-A1-2, you can skip this section as they are shipped completely wired, ready to be plugged into a PC.
Components needed:
- Any EVE accelerated display
- EVE breakout board
- A 30-pin FFC cable (6-inch, 12-inch)
- Jumper wires
- Any 3.3V, SPI-capable microcontroller of your preference. We use a Seeeduino (Arduino UNO clone) in our development kits
Wiring
First, connect the 30-pin FFC to J_HOST on the EVE display and connect the other end of the cable to J_DISPLAY on the breakout board, aligning pin 1 of each connector.
Second, wire the breakout board to the microcontroller per the table below (NOTE: this setup follows the pin declarations used in our demo code).
| Breakout Board Pin (CFA10098) | Microcontroller Pin (Seeeduino) |
| Pin 1: 3.3V (Power) | 3v3 |
| Pin 2: GND (Ground) | GND |
| Pin 3: SCK (Serial Clock) | D13 |
| Pin 4: MOSI (Serial Data Out) | D11 |
| Pin 5: MISO (Serial Data In) | D12 |
| Pin 9: CS (Chip Select) | D9 |
| Pin 10: INT (Interrupt) | D7 |
| Pin 11: PD | D8 |
| Pin 14: GND (Ground) | GND |
Third, determine how to power the backlight. Refer to the EVE display module’s datasheet for more information as there are different requirements for different EVE displays.
For instance, the CFAF1024600B0-070SC-A1 requires an external power supply capable of sourcing 5V at 1A to drive the display backlight. While the CFA240320E0-024SN can have the backlight driven without additional connections. To connect an external power supply to the adapter board, ensure the “BL=3v3” jumper is open and connect the positive terminal to pin 1 of J_BL_PWR and the negative terminal (GND) to pin 2.
Finally, plug in the microcontroller to your PC.
Software setup and navigating our demonstration code
Our demo code, available under the “Files and Downloads” section of each product page or on our GitHub repository, will be used to bring up the display wired in the previous section. Download the package and open the files in your preferred IDE. Once open, navigate to the file named “CFAxxx_defines.h” where xxx will vary based on the display used. The different demos are turned on and off through defines as shown in the image below:
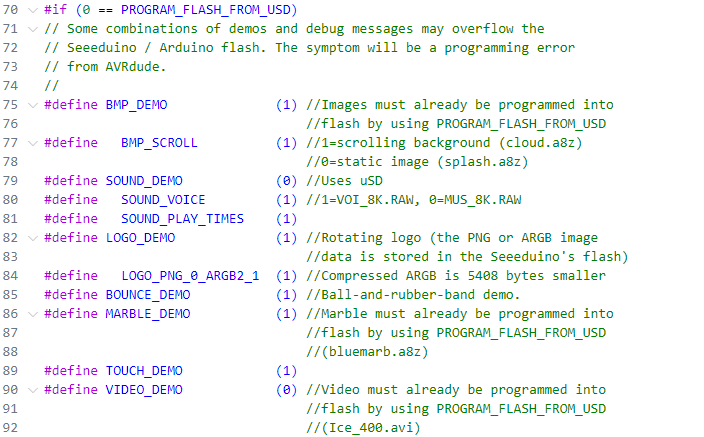
Setting a demo to 1 will turn it on and vice versa. The number of demos that can be run at a single time is limited by the MCU memory. After selecting the demos, the sketch can be uploaded to the MCU and observed on the EVE. If you are interested in looking into how each demo works and is put together, navigate to the file named “demos.cpp” and find each #define you are interested in.
Additional libraries and references
The command set used in our demo code is derived from the Bridgetek Programmer’s Guide. The guide provides more insight into the various display list commands, register descriptions, and drawing lists found in our demo code. Additionally, it provides users with examples of how they can achieve specific functionality. Some users may also find the Camera to EVE Application Note an interesting demonstration of the hardware capabilities made possible via EVEs.
Don’t forget to read our blog post on how to put up custom images on EVE displays if the default BMP and LOGO demos are too boring for you (or if you would prefer to get a visualization of a more realistic application image).
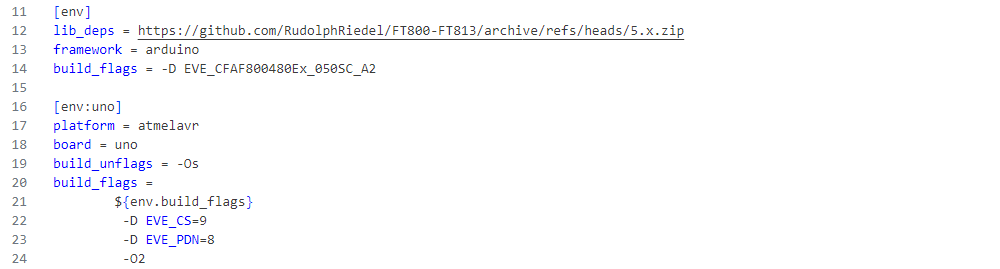
Finally, this GitHub Repository by RudolphRiedel may prove useful if you want to try out more EVE-compatible examples. The library has been put together with several MCUs in mind and may be useful if you want a working example for your MCU with few/no modifications being required. To try out an example with one of our displays, add a define to the “platformio.ini” file similar to that shown below:
Contact us
If you have any questions, we can be reached at support@crystalfontz.com, we also provide chat and telephone support Monday through Friday during our open hours.
We love to hear about your projects! Find us around the web (YouTube, Facebook, Instagram, LinkedIn, Twitter, Forum) and let us know what you’re working on.

Khayam is an Electrical and Electronic Engineer who migrated to the United States in 2022. He is a passionate academic interested in emerging technologies in the fields of AI and Robotics.
Hobbies
In his free time, Khayam enjoys watching Anime, reading Manga, and working on Digital Art. His favorite pastimes include; spending time with his girlfriend, gaming with friends, and catching up with his family.